Tuesday, 15 May 2012

Light-sensitive Alarm Project

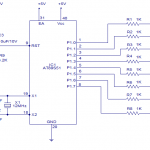
The circuit detects a sudden shadow falling on the light-sensor and sounds the bleeper when this happens. The circuit will not respond to gradual changes in brightness to avoid false alarms. The bleeper sounds for only a short time to prevent the battery running flat. Normal lighting can be used, but the circuit will work best if a beam of light is arranged to fall on the light-sensor. Breaking this beam will then cause the bleeper to sound. The light sensor is an LDR (light-dependant resistor), this has a low resistance in bright light and a high resistance in dim light.

Adjustable 1-10 Minute Timer Project

This circuit starts timing when switched on. A green LED lights to show that timing is in progress. When the time period is over the green LED turns off, a red LED turns on and a bleeper sounds. The time period is set by a variable resistor and it can be adjusted from 1 to 10 minutes (approximately). It could be used to set a time limit when playing games or as an egg-timer in the kitchen.
Read more at : http://www.kpsec.freeuk.com/projects/timer.htm

Simple Electronic Lock Project

There are six (or more) push switches. To 'unlock' you must press all the correct ones at the same time, but not press any of the cancel switches. Pressing just one cancel switch will prevent the circuit unlocking. When the circuit unlocks it actually just turns on an LED for about one second, but it is intended to be adapted to turn on a relay which could be used to switch on another circuit.

Read more at: http://www.kpsec.freeuk.com/projects/lock.htm

Simple Component and Continuity Tester

This simple project may be used for testing components, as well as checking circuit board tracks, wires and connections for continuity (conduction). It tries to pass a small current through the item being tested and the LED will light brightly, dimly or not at all according to the resistance of the item:
Read more at http://www.kpsec.freeuk.com/projects/simplet.htm

Traffic Light Project


This project operates red, amber and green LEDs in the correct sequence for a single UK traffic light. The time taken for the complete red - red & amber - green - amber sequence can be varied from about 7s to about 2½ minutes by adjusting the 1M preset. Some amber LEDs emit light that is almost red so you may prefer to use a yellow LED.
The 555 astable circuit provides clock pulses for the 4017 counter which has ten outputs (Q0 to Q9). Each output becomes high in turn as the clock pulses are received. Appropriate outputs are combined with diodes to supply the amber and green LEDs. The red LED is connected to the ÷10 output which is high for the first 5 counts (Q0-Q4 high), this saves using 5 diodes for red and simplifies the circuit. 

How to Make B.Tech project at low cost and make it best.

Do not try to copy entainr design or circuit. rather get inspreation.
Study the design carefully. do necessary survey about components that are available before you chose the project.
Make tings simple not so complicated
Make the project relevant to your subject.
Select project title carefully such that it should reflect your actual work on the project.
Make your project report your self. ant make it transparent.
remember project report is not an encyclopedia. 

Friday, 11 May 2012

PIC16F684 based Digital Amp Meter

This is a PIC microcontroller based Digital Amp Meter. It can measure AC or DC current up to 30A and display on 3 digits 7-segment with resolution 100 mA. The ACS712 from Allegro to be used for current sensing. It is designed for ease of use and no calibration required.[more]

VAPS - Vehicle Accident Prevention System


VAPS is designed with a high speed computing device, the PIC32, a 32 bit flash microcontroller that forms the brain of this system. It is a preventive/corrective system and tries to check bad/rash driving by generating internal/external alerts and 911-SMS. The idea behind this concept is to warn the driver and also generate external alerts warning other drivers on the Freeway. The ultimate measure is to send a 911-SMS with vehicle regn. no., vehicle position(LAT/LON) and type of driving.[more]
http://mypic32.com/web/guest/contestantsprofiles?profileID=44407

Building a simple antweight R/C combat robot


In this guide we will show you how to make a simple antweight R/C combat robot using a Sabertooth 2X5 R/C. The 'bot doesn't necessarily have to be used in combat - it is a pretty fun toy to drive around the office too! There is a certain satisfaction you get from driving your own homemade vehicle that you can't get from an imported Walmart toy. The Sabertooth 2X5 R/C will be used to interpret signals from a radio control system, and vary the motor speed so you can drive the robot around. The project requires basic knowledge of electronics (Volts, amps, battery polarity and wiring) and intermediate soldering skills. The project can be completed in a day, with most of the time spent waiting for glue to dry.
For more info  Click hear

Top sites for 8051 tutorials

 This web site is dedicated exclusively to the 8052 microcontroller, related products (both hardware and software), and 8052 derivative chips. This includes the traditional 8052, 8051, 8032, and 8031 along with more modern derivatives such as those by Atmel, NXP, Silicon Laboratories, and many others.

This web site gives good theritical and practical approche for 8081 and other microcontroller


http://www.ikalogic.com/part-1-introduction-to-8051-microcontrollers
This link contains a very short tutorial on 8051

8 channel light chaser using 8051


6 function 8 channel light chaser using 8051. A 6 function 8 channel light chaser using 8051 is shown here. The hardware and software of this circuit are very simple and the light functions gets repeated one after another  automatically. P1.0 to P1.7  of the microcontroller (AT89S51) are assigned as the output pins. Corresponding LEDs are connected to the output pins through 1K current limiting resistors (R1 to R8). The sequence by which the output pins (P1.0 to P1.7) goes high and low is determined by the program and the LEDs follow this sequence. Circuit diagram of the 6 function…
Read More

Blinking LED using 8051

Blinking 1 LED using 8051 This is the first project regarding 8051 and of course one of the simplest, blinking LED using 8051. The microcontroller used here is AT89S51 In the circuit, push button switch S1, capacitor C3 and resistor R3 forms the reset circuitry. When S1 is pressed, voltage at the reset pin (pin9) goes high and this resets the chip. C1, C2 and X1 are related to the on chip oscillator which produces the required clock frequency. P1.0 (pin1) is selected as the output pin. When P1.o goes high the transistor Q1 is forward biased and LED goes…
Read More

4 Books to Learn 8051 Microcontroller-Indian editions

Hello friends, it has been a while since I published here. The fact is that I have been busy working on some good projects, that I didn’t get enough time to write anything useful. This article is for students and hobbyists who are interested in playing with micro controllers. I thought of introducing you to a handful of cool and really useful books on 8051 micro controller. The books I suggest here are all Indian editions and hence links to Indian shopping site – Flipkart is only given. Very soon I will come up with an article that reviews global…
Read More